
Soldering Techniques
In this article we will go over the basic fundamentals of good soldering techniques.
Soldering like most things is a task that becomes easier with practice. Practice is the best teacher. With practice you know when the solder is liquid enough to flow properly and make a good solder joint. But to help you learn we put together this illustrated guide.
For the purposes of this guide we will use a soldering station, but the techniques illustrated here would be the same for a pencil, butane or cordless soldering iron.
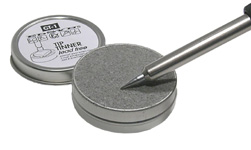
Tinning the soldering tip:
Apply solder liberally to the tip until it covers the tip then wipe the excess solder of with a damp sponge (many soldering stations come with a sponge). The tip should look shiny. There are also tip tinning compounds available for this task. Re-tin the tip as soon as it begins to look dull. Keeping your tip well tinned will not only allow you to make better solder joins, but it will also prolong the life of the tip. If the tip becomes pitted it is best to replace it. It is not a grate idea to file the tip to remove the pitting, as this also removes the plating.
 |  |
Use the correct size tip for the job. There are many style and sizes of soldering tips available. For small delicate jobs use fairly fine tip, for larger jobs use a larger tip. Larger tips are capable of transferring more heat faster to the joint.
Another important point to remember is that the items to soldered must also be clean – component leads and printed circuit boards must be cleaned of any oxidation of contamination. Solder will only adhere to clean metal.
Solder:
Solder is a mixture of different metals designed to melt at specific temperature. One of the most common mixtures is 63% tin and 37% lead which melts at 361°F (180°C). This mixture is also called eutectic because of its rapid transition from a solid to a liquid. It does not have what is called a plastic state (the state between a solid and a liquid). Also diameter of the solder should be appropriate for the job. Small diameter solder is appropriate for small pads on printed circuit boards and small components, larger diameter solder should be used for larger components.
Another option that is more eco-friendly is lead free solder. As the name implies this type of solder contains no lead. Again there are a number of mixtures available but one of the more common mixtures is tin, silver and copper. These solders have a melting point of 448°F (217°C). As you can see these mixtures have a much higher melting point and require slightly more skill in their use. It is highly probable that solders containing lead will be phased out over the next few years due to harmful effects of lead.Solder suitable for electronic applications contain a center core or Rosin (also called flux) which is a type of mild acid that helps clean the surfaces to be soldered. The common name for this solder is rosin core solder.
Important note: Never use acid core solder – it is designed for plumbing only!
The question that frequently comes up is, do rosin flux residues need to be removed?
Rosin flux residues are non-conductive and non-corrosive. Under normal circumstances they do not have to be removed from a printed circuit assembly. Rosin residue removal would be for cosmetic considerations. In an environment where the working temperature of the assembly will exceed 200°F the rosin residues will melt and become conductive, in these situations flux removal is required. If you decide to remove the flux, you must thoroughly clean the board leaving no residue. There are numerous flux-removers available from you electronics distributor.Soldering:
The two most important factors in a good solder joint are time and temperature. There is a fine balance between applying the correct amount of heat to make a good solder joint and applying too much or too little resulting in a poor solder joint. As mentioned at the beginning, practice is the best way to get consistent quality solder joints.
If you are using soldering station with adjustable temperature control, set the temperature to approximately 100°F above the melting point of the solder. You can check if the tip temperature is correct by using the following method. The tip should not be hot enough to melt the solder instantly when applied to a properly tinned tip.
Use appropriate diameter solder for the job (see details under solder above). The smaller the diameter of the solder the less heat required to melt the solder.
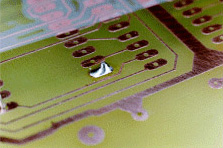
Place the tip of the iron on both items to be soldered – that is, heat both items at once. Place the solder against the joint opposite the tip (see Picture 1 below).
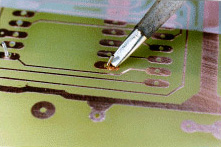
Picture 1
The solder should melt within a second or so – if it does not melt quickly you may need a higher temperature setting. Feed the solder slowly until it flows evenly around the joint (see Picture 2).
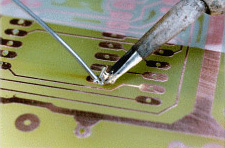
Picture 2A good solder joint should look shiny and have a slight peak where it flowed up the component lead (see Picture 3).
Picture 3Let the joint cool without allowing anything to move. If the joint is disturbed it may have a dull, satin look – typical of a poor solder joint.Carefully check the joint. If it has beaded of has left a void around the component lead, you have a poor solder joint (see Picture 4) and it need to be re-heated and a small amount of solder added.

Picture 4
Experiment on a scrap circuit board – check examples below and try to produce the same results as the example, including the poor ones. This will give you a better understanding of the causes of poor solder jointsSafety warnings:
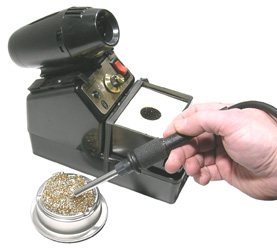
Soldering produces fumes – It is good idea to solder in a well ventilated area or use a fume extraction device like one illustrated below.Wash your hands after soldering.